RAW and colour files
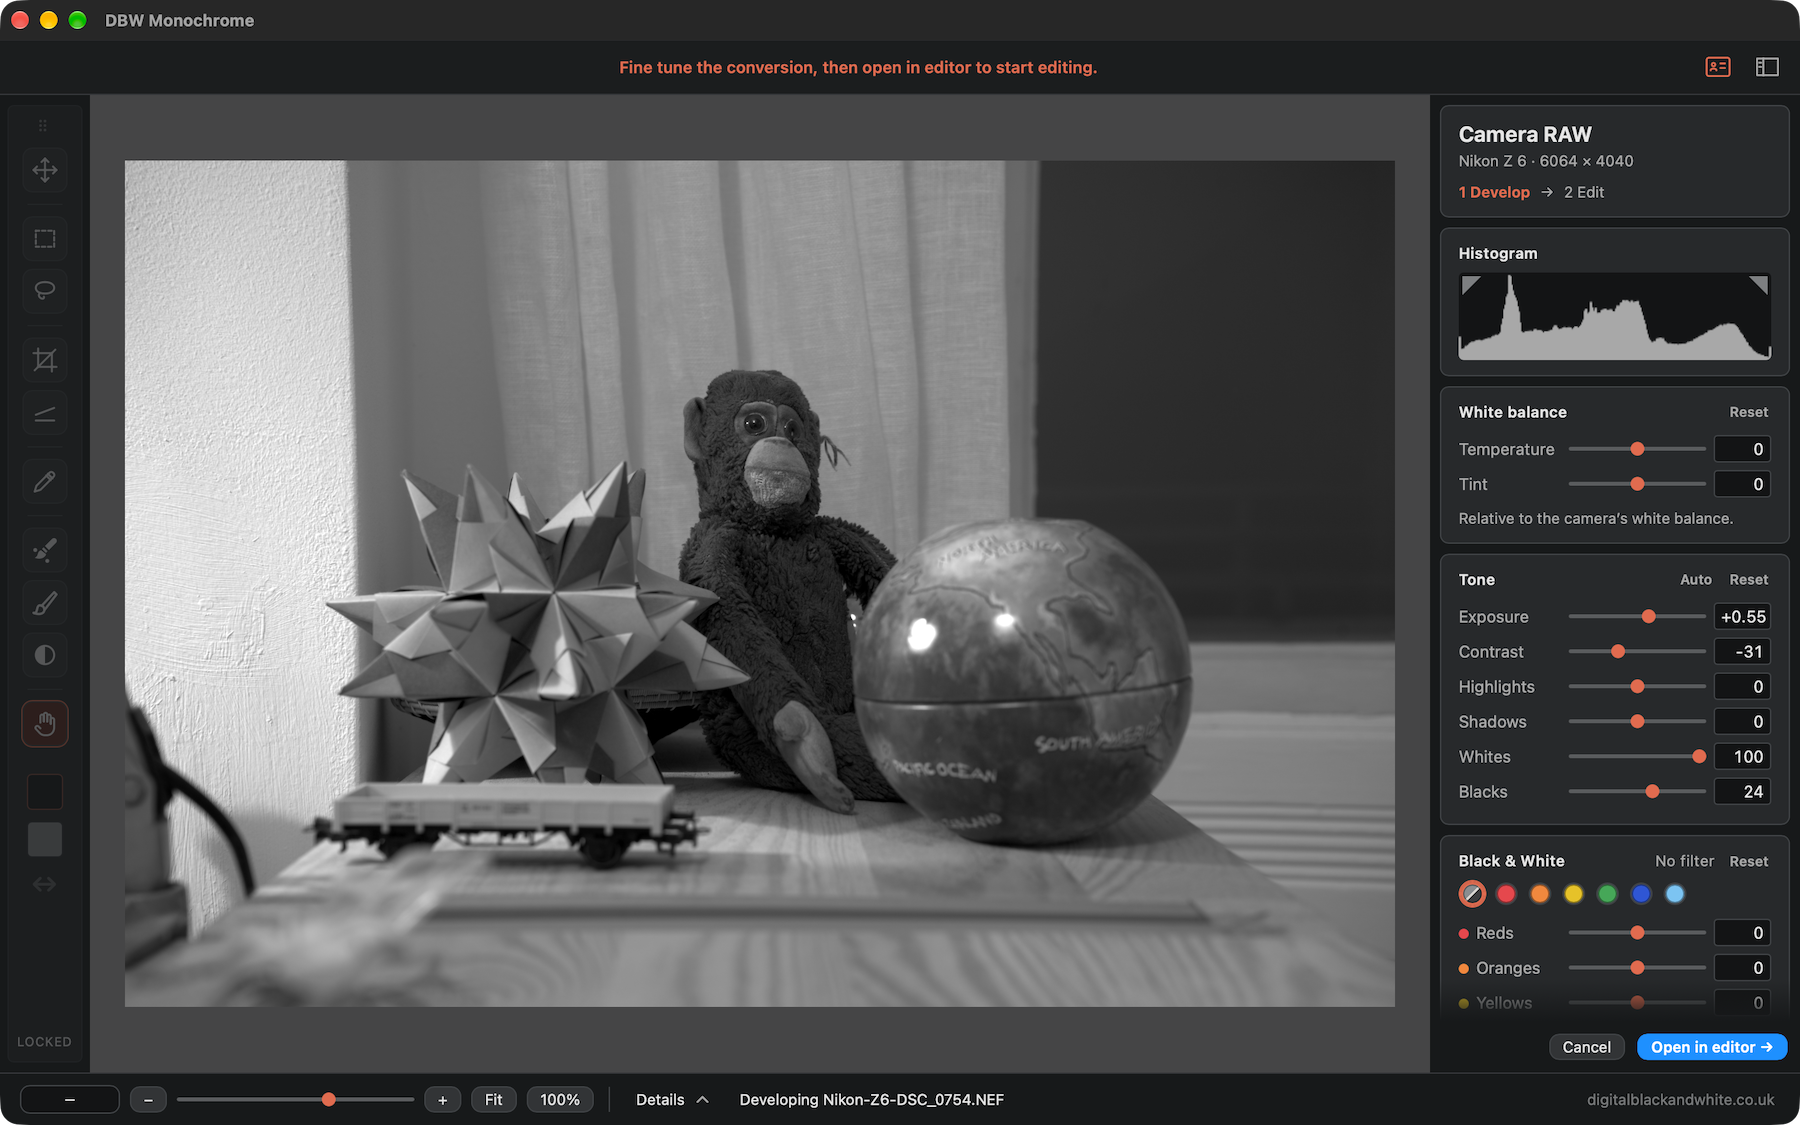
DBW Monochrome works on grey pictures. When you open a camera RAW file or a colour TIFF, PNG or JPEG, the Develop panel appears first. Here you decide how the colours become grey tones, and then you press Open in editor. Only the grey picture goes on to the editor; the colour is not kept. Cancel leaves the file unopened.
While the Develop panel is open the tools and layers are locked, and the panel says so at the top.
Grey files skip this step
A grey file opens straight into the editor. So does a colour file whose red, green and blue are equal, which is how some programs save a black and white picture. A sepia or other toned picture is treated as colour.
What you can set
- Histogram: shows the picture as it will look in black and white. Red and blue mark the tones that would clip to white or to black.
- White balance (RAW files): Temperature and Tint. Use Reset to return to the camera's setting.
- Tone: Exposure, Contrast, Highlights, Shadows, Whites and Blacks. Auto sets exposure and the tone sliders for you from the picture; a RAW file opens with Auto already applied, and Reset in this group returns every slider to zero.
- Black & White: the same job as a colour filter on the lens. Choose a swatch (Neutral, Red, Orange, Yellow, Green, Blue or Sky) to make that colour lighter and its opposite darker, then fine tune with the red, green and blue mix and the eight hue sliders.
The picture updates as you move the sliders. Click Reset in a group to put that group back.
RAW files
RAW files are developed with the LibRaw library. A RAW file gets a gentle contrast curve before your settings are applied, because the raw data is flat. If the picture still looks flat after Auto, try raising the Contrast.
What happens when you open a RAW file
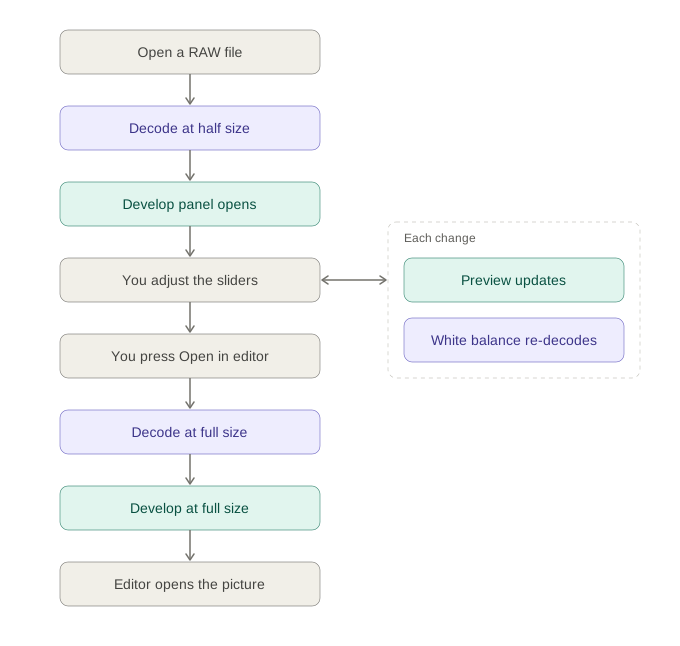
- A quick, half-size decode. DBW Monochrome reads the RAW file at half its size, so the Develop panel appears quickly.
- The Develop panel opens with Auto already applied.
- You adjust the sliders. Each change updates the preview you see. Changing Temperature or Tint decodes the file again at half size, because white balance is part of reading the RAW data, so those two take a moment longer than the others.
- You press Open in editor. The file is decoded again, this time at full size, and your settings are applied to the whole picture.
- The editor opens with a 16-bit grey picture. Nothing of the colour is kept. Cancel in the Develop panel goes back without opening anything.
A colour file (TIFF, PNG or JPEG) uses the same Develop panel, without the white balance controls, and reads the file only once. See What happens when you open a colour file. A grey file, or a .dbw project, skips Develop and opens straight into the editor.
What happens when you open a colour file
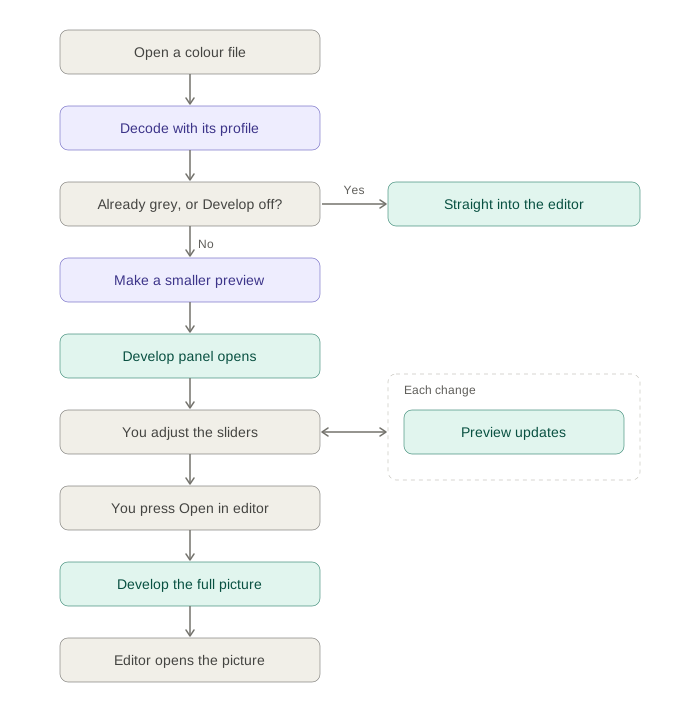
A colour TIFF, PNG or JPEG uses the same Develop panel as a RAW file. It has no white balance controls, because the white balance is already part of the picture.
- The whole picture is read once. It is converted using its colour profile (sRGB, Adobe RGB, Display P3 and others), and kept in memory.
- A picture that is already grey skips Develop. If the red, green and blue are the same, so the picture is black and white stored as colour, it opens straight into the editor. So does any colour file if you have turned off Show Develop for colour files in Settings. A sepia or other toned picture counts as colour and goes on to Develop.
- A smaller preview opens in the Develop panel, up to 2400 pixels on its longest side, so the sliders stay quick.
- You adjust the sliders. Each change updates the preview.
- You press Open in editor. The picture already in memory is developed at full size with your settings, so there is no second read of the file. The editor opens with a 16-bit grey picture. Nothing of the colour is kept.
Colour files with a profile
Colour pictures saved in sRGB, Adobe RGB, Display P3 and other profiles are converted correctly, so the same picture saved in two profiles gives the same grey.
Once a RAW or colour picture is in the editor it is plain grey in the editor's own working space, so the status bar shows Gray Gamma 2.2 (the camera's or the file's colour profile was used during the conversion). The question about files with no profile, described below, is not asked for these.
Skip Develop for colour files
Turn off Show Develop for colour files in Settings to open colour pictures straight into the editor with a neutral grey conversion. Turn off Apply Auto when a RAW opens if you would rather start from zero.
Pictures with no colour profile
Some images carry no colour profile, so the app cannot tell how their greys are meant to look. It reads them as Gray Gamma 2.2, the grey the editor works in, and the status bar says "No colour profile". For most, this is right and nothing needs doing.
If you know a file was made with another grey profile, turn on Settings → Opening files → Ask how to read a picture with no colour profile.
When a picture with no profile opens, a small box asks how to read it:
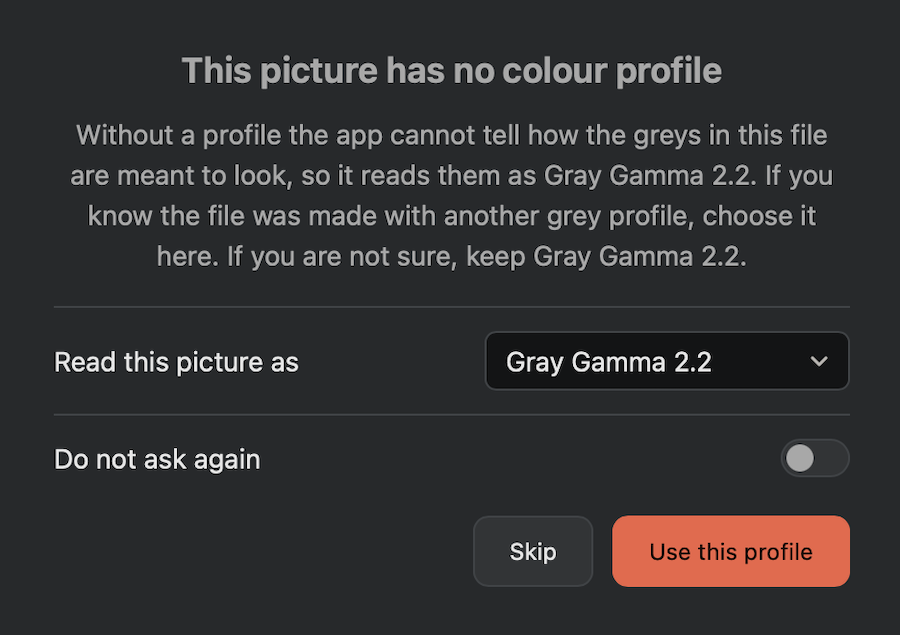
- Gray Gamma 2.2: the default, and what the app does without the question.
- Gray Gamma 1.8, Dot Gain 20% and sRGB: profiles used by some programs for grey pictures. Reading a picture as the wrong one makes it look a little lighter or darker.
- Linear (gamma 1.0): raw scanner data that has not been given a display curve. Read as anything else it looks far too dark.
Choose Use this profile to apply your choice, or Skip to leave the picture as it is. The choice is stored in a project when you save it, so the picture opens the same way next time. The Do not ask again switch turns the question off; you can turn it on again in Settings. The original file is never changed.